
![Canon 5D MkII PC Workflow – Adobe Premiere CS4 [UPDATE]](https://www.nextwavedv.com/wp-content/plugins/phastpress/phast.php/c2VydmljZT1pbWFnZXMmc3JjPWh0dHBzJTNBJTJGJTJGd3d3Lm5leHR3YXZlZHYuY29tJTJGd3AtY29udGVudCUyRnVwbG9hZHMlMkYyMDEwJTJGMDElMkZlZGl0b3IuanBnJmNhY2hlTWFya2VyPTE2OTk1ODU0MDQtOTUwMzkmdG9rZW49Y2Q2NGNhMDc2MGZjYmFmYg.q.jpg)
I’m going to take a little time to go over two things: my editor and my workflow for 5D footage.
Editor:
My first setup was a HP Pavilion Intel Quad core Q6600 desktop. I used it for my HV20 thru my XH-A1 and some of my 5D MkII footage. I paid $1,100 back in January of 2007 and it still works great.
When we started editing the Doritos commercial Sean wanted to try out his new Intel i7 desktop, so we brought the footage over to his house. I was very impressed at how well the i7 handled the transcoded 5D footage (I’ll talk about transcoding more in a little bit). So that got me interested in a new system…but this time I wanted to be mobile.
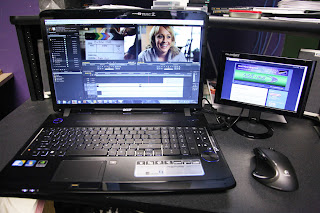
Which led me to my current editor, the Acer Aspire 8940G. It has an Intel Core i7 processor, 4GB RAM, Blu-ray drive, and 18.4″ 1920×1080 HD screen. It is much zippier then my desktop and I’m really happy with how it edits.
What are the downsides? Well it doesn’t have good speakers (at least compared to my monitors), so I always plug in my monitors before I finalize sound on any project. Also, even after calibration, I don’t trust the laptop’s screen to be truly color accurate. So before I finalize a project, I always color correct on a good external screen.
But all that said, for the price the Acer is a fantastic editor.
I love being mobile too. I can shoot on location and jump right onto my laptop and review the footage or start editing right away. Plus it lets me edit at my favorite coffee shop…which my desktop never could 🙂

Here we are on location at one of the Jewelery shoots and I’m reviewing footage. Pretty sweet!
Oh, and since I’m pretty much addicted to having dual screens, I bought a DoubleSight 9″ USB monitor. It’s not very good for video editing, but works great for viewing websites. I love it because it runs both signal and power over USB…no VGA or power cables to worry about.
Workflow:
I did a review on Philip Bloom’s 5D MkII Training DVD and in that review I told people that I would recommend it if you are new to filmmaking. In his DVD, Philip goes over Mac workflow, but leaves PC users with very little so I wanted to give you guys a simple workflow method for PC users.
First I’m going to assume you have a quad core PC or are at least able to view raw footage from your 5D in Windows Media Player without it skipping. If you can’t do that, your computer may not be able to handle 5D footage very well. Also we’ll assume you’ve already offloaded the footage from your CF card to your computer. And lastly, I use Adobe Premiere Pro so this workflow will revolve around that. If you use Avid, Vegas, or something else try to substitute parts of this guide for your setup.
Now that it’s on your computer, you’ll need to transcode it. Raw 5D footage is encoded in H.264 which is great for capturing, but horrible for editing. Macs can read H.264 and edit it pretty well, but PC editors don’t use the GPU of the computer the same way Macs do so transcoding is a necessary step in PC editing.
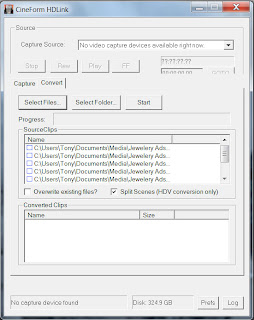
I personally use Cineform NEO Scene for my transcoding. Mainly cause it creates an editable, lossless file that is converted from 30 fps (which is the 5D’s only frame rate) to 29.967 (which is the industry standard frame rate).
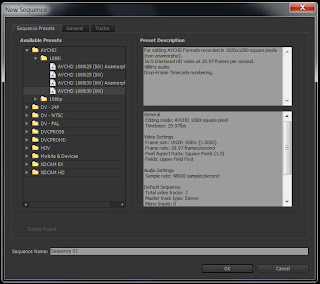
Now that you’ve transcoded your footage, open your editor. Select a project that is 1080 HD at 29.967 (sometimes shown as 60i). Go ahead and drag in your transcoded footage and try playing it back. You will notice that the raw footage from the 5D will barely play at 1 fps in your editor, but the transcoded footage should play back fairly smoothly. Depending on the power of your PC, you may notice some choppiness in playback, but that has nothing to do with the quality of the footage. It just means your computer has a hard time editing Full HD 1080 footage. HD editing is very resource intensive so the newer and more powerful the computer, the better.
Hopefully that helps. Remember, transcoding is pretty much a requirement of PC editing of 5D footage. If you’re planning on buying a 5D MkII and a PC to edit it on, add Cineform (or something similar) to the cost of your purchase.
Good luck!
[UPDATE]
I thought I’d share one more thing. Cineform is great for commercial productions when you want the best possible editable copy of your footage. But what if you just want something smaller to edit and archive?
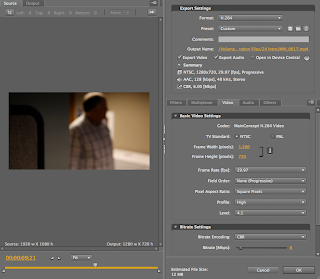
I’ve been using Adobe Media Encoder to convert my 5D footage down to 720p 29.97 which works great. The file sizes are much smaller and it’s a standard format that I can work with.
I usually compress out an MP4 using an H.264 encoding. Here are the typical settings I use. Depending on your sequence settings, you may want to change a few of the settings around until you get something you are happy with.

